Post Contents
10. Sharing Videos and Reviews
11. Other Features and Functions
Introduction
The most important tool yet developed for learning and teaching fly casting was not invented by a fly angler. Video analysis software is going to revolutionize the way fly casting is taught and learned. I’m so convinced of this that I’ve assembled this ebook-in-the-form-of-a-blog-post on the subject.
The purpose of this post is to get you, the student of fly casting, up and running with video fly casting analysis using the Hudl Technique app. In this post I’ll explain how this technology will improve your casting, and I’ll show you how to get started quickly and inexpensively. Next, we’ll review Hudl’s basic analytical features and functions and how you might use them. After that, we’ll cover how to use the app to get instant visual feedback during a lesson, as well as how to create permanent voiced-over video reviews you can use to direct your practice sessions until your next lesson. Perhaps the best part is that you’ll be able to do all of this even if your casting coach doesn’t know a thing about the technology.
If you’re not particularly tech-savvy, don’t worry about it. Neither am I, but I was able to figure it out pretty quickly, and I’m confident this post will help you do the same.
Just to be clear, I have no connection with Hudl other than as a customer (I’m sure they don’t know I exist). I’m simply providing this information to you in the interest of your becoming a better fly caster. Even if you happen to choose a sports analysis software package other than Hudl Technique, I’m sure there’s still plenty in this post that you’ll find helpful.
.
1. Why Video Analysis?
There are a number of challenges with trying to learn any physical skill. For starters, what’s actually happening in the skill in question is often very different than what it looks like is happening. So it is with fly casting. The typical beginner looks at a fly cast and believes the caster is using the rod to throw line back and forth in the air, and this misunderstanding is reflected in his technique when he attempts to cast the line. Add to this that what we think we’re doing when we cast is often very different from what we’re actually doing (this is true of casters of all levels). One of the biggest problems with overcoming these obstacles is your inability to see yourself cast.
In order to become better casters, some fly anglers take lessons with casting instructors. The instructor educates you on proper technique, observes and analyzes your performance, and provides you with feedback. Ideally you use this feedback to direct regular practice sessions, thereby leading to your becoming a better fly caster. In subsequent lessons the instructor or coach provides you with further instruction, observes and analyzes your performance, provides you with more feedback that directs further practice sessions, and so on in a continuous cycle in which you progress to a level of proficiency where you no longer need a coach (perhaps you become good enough that you become a casting instructor yourself).
Your coach’s success depends, among other things, on the quality of his observations and analysis. Given this, it’s important that his observations are as accurate, objective, and comprehensive as possible. Challenges arise here as well. Although the technique of a beginning fly caster may be glaringly obvious and easy to assess, the same is not true of the more advanced student. The better the fly caster, the less obvious his errors, and the more difficult it will be to accurately observe and analyze his technique. This is particularly true when we can observe the cast only in real time and we have no permanent record of the performance to which we can refer, and so must rely on memory. Add to this that all coaches bring to the process their own perceptions, biases, assumptions, and previous experiences.
Video recording provides a permanent resource for fly casting analysis that is accurate, objective, and free from bias. In a word, the camera doesn’t lie. And the ability to record and play back video in slow motion—my iPhone and iPad both shoot at 120 frames per second—allows us to view aspects of the cast that are difficult, if not impossible, to see in real time.
Depending upon what studies you read, as much as 65 percent of the population are visual learners, while only about 30 percent are auditory learners. What this means to you is that you probably aren’t maximizing your learning simply by listening to your coach’s verbal critique. Feedback likely will be of much more value to you if you can see it for yourself.
Using video analysis to help you to learn how to fly cast gives you the ability to track your progress. By recording a baseline cast and building a library of content over time, you can see exactly where you have made improvements. Such feedback will contribute greatly to your motivation, as you are able to gauge the progress you have made.
A handful of fly casting instructors have been shooting video of students for years (I remember being video taped at Joan Wulff’s Instructors’ School back in the late 1990s). However, back then a camera that would shoot quality video was cost-prohibitive to the average person. And until fairly recently, the technology necessary to use video analysis was available only to well-funded professional and college athletic teams. Today, if you own a smartphone you have all the equipment you need to get started.
The bottom line is, to become an exceptional fly caster–and particularly if you wish to become a fly casting instructor–you will have to learn how to analyze the fly cast, one way or another. Video analysis software is a tool you can use to facilitate this.
If this technology had been available when I was learning to fly cast, I’m convinced it would’ve taken years off my learning. If you learn to utilize it, I’m equally convinced it can take years off yours.
.
2. Hudl Technique at a Glance
Formerly Ubersense, Hudl Technique is among the most popular apps (along with Dartfish and Coach’s Eye) that can be used to record and analyze video in a wide variety of sports. Features and functions of most interest to students of fly casting include:
Recording and Managing
- Record video up to 240 frames per second (if supported by device).
- Import video from camera roll, email, or apps such as Google Drive or Dropbox.
- Organize videos by athlete (you, your fellow fly casters, or your coach).
- Mark Favorite videos for quick reference.
Analyzing
- Slow-motion playback in multiple speeds and frame-by-frame.
- Zoom and pan videos to view detail.
- Use drawing tools to measure or highlight form.
- Compare two videos—stacked, side-by-side, or overlay.
- Synchronize comparison videos.
Coaching
- Use during instruction to get instant feedback.
- Create voice-over reviews on single or comparison videos (reviews available only for iOS devices).
- Add drawings to voice-overs.
- Track and compare your progress over time.
Team
- Create and manage a team (this might consist of you, your fellow fly casters, and your coach).
- Import contacts from your address book or enter manually.
- Organize your videos and reviews by team member.
Sharing Video
- Share videos with anyone directly from the app—friends, coach, or anyone else.
- Post to social media.
- Export to camera roll and third-party apps such as Google Drive.
For a more thorough overview of how the app works, visit the Hudl Technique Support Page.
.
3. Getting Started

Figure 3-1. If you have a smartphone you have just about everything you need to get started.
Getting started with video fly casting analysis using Hudl Technique is quick, easy, and perhaps best of all, inexpensive. If you have a smartphone you have just about everything you need to begin. Simply go to the App Store—iTunes for Mac, Google Play for Android—and download the free Hudl Technique app. (Presently there is no version of Hudl Technique for Mac Desktop or PC, nor any plans to create one.)
For iOS, click here.
For Android, click here.
Recommendations
The basic Hudl app is free, and you should try the free version for a week or two to see if you like it. If you do like the app, you should consider signing up for Hudl’s Elite version (at this writing a monthly subscription costs about $6 US; a yearly subscription is about $40), which provides you with unlimited cloud storage. Video takes up a lot of space, and if you record only a few videos a month you’ll quickly use up the storage on your phone or tablet.
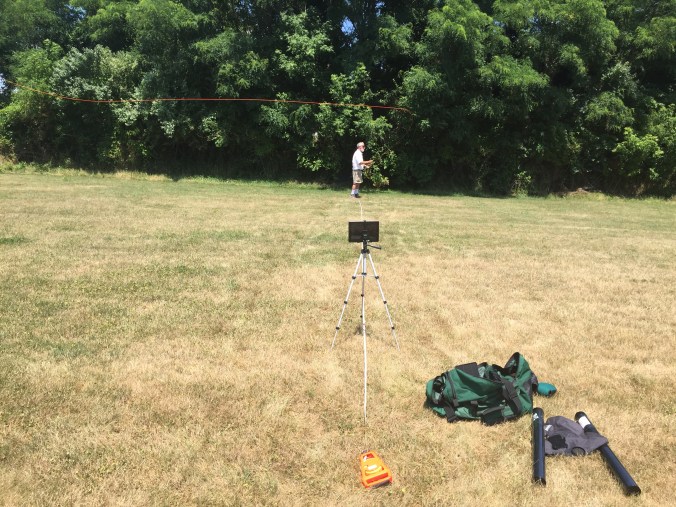
Figure 3-2. I suggest you invest in a tablet, a tripod, and a 100-foot tape measure.
The newer iPhone cameras are very powerful. The camera of the newest iPhones are actually more powerful than the camera of my iPad. Although I created my first video reviews using the iPhone 6–I suggest you consider investing in a tablet. (I use the iPad Air 2, which I prefer over the Android system simply because of the latter’s inability to create reviews). A tablet will provide you with a much larger work space than a phone, which makes the drawing tools easier to work with, and the larger screen will make it easier to see any instant feedback your casting coach provides. Whether you use a phone or a tablet, a touchscreen stylus is a more precise drawing instrument than your finger.
I also suggest you eventually obtain a tripod. Tripods designed specifically to hold a phone or tablet are too numerous to cover here, but you can purchase a serviceable model for less than $40 US (this tripod is very similar to the one I use). A tripod will allow you work alone and to video your coach (or anyone else) hands-free from a fixed point and a consistent distance. Also, using a tripod will eliminate any movement that comes with shooting video with a hand-held camera.
A 100-foot tape measure is a good tool for any fly angler to own (I use one to mark my fly lines for length). In videoing the fly cast you can use a tape measure to determine how far from the camera the caster needs to be to see whatever it is that needs to be seen. When working with a casting coach remotely, you can instruct him that the video clip you shared with him is precisely X number of feet from the camera. This is particularly helpful if the coach is willing to provide you with videos of himself you can compare to your own.
.
4. Settings
To access your Settings, tap your Profile icon at the left of the screen, then tap the Gear icon at the top left of the screen. This will call up a dialog box allowing you to adjust various settings (Figure 4-1).

Figure 4-1. Access your settings by tapping the Profile icon, then tapping the Gear icon above your Profile photo.
Elite Settings allows you to choose your Subscription (monthly or yearly) and also allows you to decide how long your videos will remain on your device before uploading them to the cloud—between 5 hours and “Keep videos forever.”
Unless you intend to shoot only a very few videos, you’re not going to want to keep them on your device forever, as video takes up a lot of space. I keep videos on my iPad for 3 days. This gives me enough time to work with them before sending them to the cloud. Should I not get to a video within 3 days, I simply download it from the cloud whenever I decide to work with it. This takes only a couple of minutes.
Edit My Profile lets you enter your name, upload your photo, declare your primary sport, connect with social networks, etc.
Edit Email Template allows you to customize the email you send out when you share videos.
Autoshare When Tagging lets you select whether or not you automatically share video with a particular athlete when you tag the video as that athlete. This is only a consideration if you put a team together and shoot video of them. (I turn this function off, as I do not want my team members—that is, my students—seeing all the video I shoot of them.)
FAQ and Support takes you to a set of tutorials that provide general information on using the Hudl app.
How-to Videos provide you with a set of general video tutorials.
Contact Support lets you email the Hudl Support team. (You can also reach them by phone.)
.
5. Shooting Video
Before you begin, first decide what you want to see in the video. It’s not always important to see the fly line, but if it is, choose a brightly colored line that contrasts highly with the background against which it is shot. The sky makes perhaps the poorest background (and a blue fly line shot against the sky becomes invisible). Orange fly line shot against the green background of a dense forest shows up well, as does a yellow fly line. (Much of the video on this site was shot using a Wulff Triangle Taper fly line in orange.) It helps to enhance contrast if the background is somewhat shaded while the fly line is lighted from above.
My ideal area would be an athletic field or park surrounded on as many sides as possible by dense green forest (I frequently use my town’s youth soccer fields—after all, I’m paying for them). This will allow you to position yourself as advantageously as possible to any wind while still being able to shoot useable video.
A fly rod built on a light-colored blank shows up much better on video than does a rod built using a black or gray blank. At this writing, two companies I know of–Temple Fork Outfitters and Echo–are producing “instructor rods” that are built on yellow or white blanks. It might be worth your while to invest in one of these rods. If you don’t wish to invest in an instructor’s rod, several pieces of white plumber’s tape (available in any hardware store) placed along the blank will help to highlight the rod and will not affect the cast.
If you have a tripod–again, I strongly suggest you get one–jump in and start shooting your own cast. By the time you actually start working with an instructor or coach, your final product should be polished enough that they find it clear and useful.

Figure 5-1. Placing the camera 35 feet from the caster is a good distance to view both body mechanics and loop formation (adjust for your needs accordingly). Notice how the fly line contrasts with the background.
As a general rule, I find placing my iPad 35 feet from the caster to be a good distance to view both body mechanics and loop formation (Figure 5-1). If you wish to focus on body mechanics and don’t need to see the loop, simply move the camera closer.
Placing the caster at the center of the screen will allow you to capture equal amounts of the loop on both the back cast and forward cast. If you wish to focus on either the back cast or the forward cast, adjust the camera so that the caster is positioned in the right or left of the screen, as the case may be. When I’m videoing myself and working alone, I carry a reflective driveway marker and position it where I intend to stand, so I can adjust the camera accordingly.
I find it most useful to shoot video from the caster’s rod-arm side. If you wish to view something from your line-hand side (such as the forward-cast haul) simply shoot from that side. There may be instances, however, where you need to shoot head-on (vertical casting from the closed stance, for example).
To shoot a video through the Hudl app, tap the Record icon, the round red button at the left of the screen. This will open the camera. The Camera Settings icon, a Gear at the right of the screen, will let you set a 10-second delay, in case you’re shooting video of yourself alone. (Frankly, I never bother with this, and simply trim all the superfluous video from the clips as I go along.) The setting below this allows you to adjust for camera speed and image quality. I keep my camera set on “Slo Mo”—that is, 120 frames per second. Beneath this, the Record icon will start the camera rolling. The Pause feature will pause the camera and the Resume feature will resume the filming. When the camera begins shooting, the Record icon transforms into a square red button. To end the shooting, simply tap this button.
Beneath the Record button you’ll find the Import icon. Use this to import a video that was not shot through the Hudl app.
.
6. Basic Analytical Features
The Hudl Technique app contains a number of features that can be used to analyze the fly cast to provide instant feedback as well as to create permanent voice-over reviews. As this app was developed to analyze mainstream athletic sports—fly casting was not even a consideration—some features will be more useful to us than others. Let’s take a look at the basic features and how we might use them in analyzing the cast. (I have not included illustrations of all of the drawing tools in use, but only the ones I use most frequently and consider most important.)
Rate of Play
Your cannot overestimate the value of being able to see yourself cast—even in real time. Your ability to see your cast in slow motion is even more valuable. This is particularly true if you are a more advanced caster. The errors of beginning fly casters are glaringly obvious. As a student progresses, however, errors become more subtle. The coach may not see them in real time. Slow motion video allows you and your coach to more clearly and objectively view the subtleties of your technique.

Figure 6-1. Hudl allows you to play back clips in real time and various rates of slow motion. You can also scrub through the clip frame by frame.
Tap the Play button, the small arrow at the bottom left of the screen (Figure 6-1), and the clip will play in real time. Tap the Slow Mo text above the button and you’ll be presented with four options, from 1/1 (real time) to 1/8. Frankly, I don’t bother much with the 1/2 or 1/4 rates of play. When I want to view a clip in slow motion I prefer the slowest rate possible.
Stop-Action and Scrubbing
You can halt a video clip at any point simply by tapping the Stop Play button. You can move through the clip frame by frame, forward or backward, by dragging your stylus or finger along the Scrubber, which is the series of vertical lines that spans the bottom of the screen (Figure 6-1).
To move through the clip more quickly, drag the tiny white button or Time Box forward or backward along the red line above the scrubber (Figure 6-1). This Time Box, which measures in 1/100 second increments, is particularly useful for locating precise moments in the cast. Whenever you are viewing video clips or creating reviews, I suggest you always have a pen and paper handy to jot down times for reference.
Zoom Function
The zoom function allows you to zoom in on a particular section of the clip (Figure 6-2). Simply touch the screen on the area of the frame you wish to enlarge using your thumb and index finger and spread them as you would to enlarge a photo using any touch-screen device. You can further pan the clip by dragging your finger across the screen.

Figure 6-2. Here I’ve used the zoom function to zoom in on the fighting butt to locate the precise instant the rod stops on the forward stroke.
Drawing Tools
The Hudl Technique app comes with a number of drawing tools you can use either to receive instant feedback or help create feedback in the form of a permanent review. Some of these tools you’ll find more valuable than others. Some you may never use.
To access the drawing tools, tap the Pencil icon at the top right of the screen (Figure 6-2). Your drawing tools will drop down. Tapping any of the tools will give you instant access to that tool. Simply start drawing on the screen. A small arrow to the left of the tool indicates the selected tool. Tap on a selected tool and it will present you with all tools and color options (Figure 6-3). In this way you can customize your pallet. Despite the color options, I tend to keep all of my tools yellow. The reason I do this is simply because one of my present students is colorblind and has difficulty seeing drawings done in red. This may not be a consideration for you as you share clips and reviews with others.
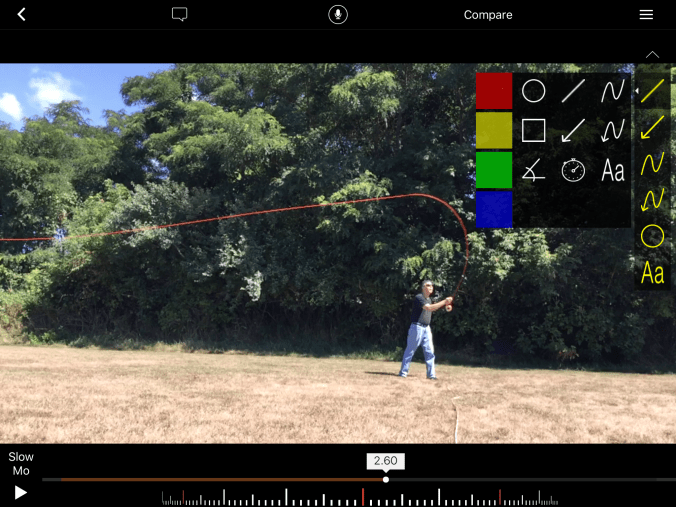
Figure 6-3. Hudl allows you to customize your pallet in terms of drawing tools and their colors.
Once you create a drawing, two options will appear in the upper left of the screen. The bottommost option is labeled Undo and the topmost option is labeled Clear (Figure 6-4). If you make multiple drawings on the screen, tapping Undo will erase the drawings one at a time, beginning with the most recent. Tapping Clear erases everything at once.
If you create a drawing while you are zoomed in on a section of the screen, and then zoom out, the drawing will also reduce in size proportionally.

Figure 6-4. Use the drawing tools to highlight various aspects of the cast.
Straight Line
Use the straight line tool whenever you need to illustrate a perfectly straight line or path. I use it to highlight the rod to show casting arc (as in Figure 6-4), to illustrate drift (Figure 6-6), etc.
Straight Line with Arrow
Use this tool to illustrate straight line with direction, such as the straight-line path of the rod tip during the forward (or back cast) stroke (Figure 6-4).
Freehand Line
The freehand line tool is good for highlighting lines that are not straight, such as the bend in the rod or the loop of line (Figure 6-5). It’s also good for quick, simple doodles.
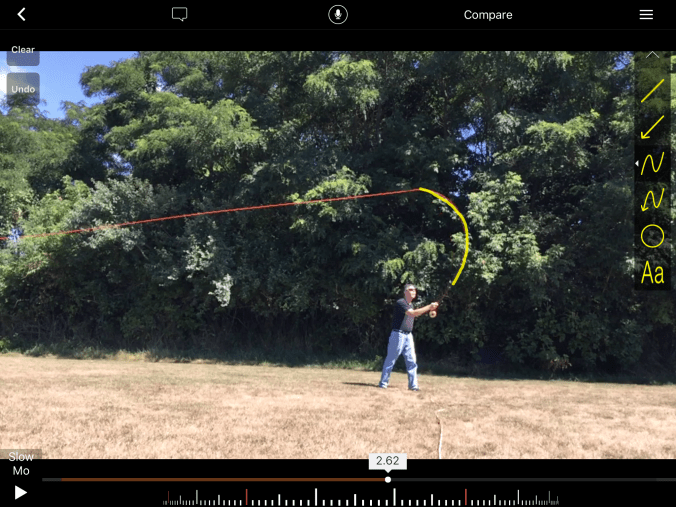
Figure 6-5. Use the freehand line when you wish to highlight a line that is not straight, such as the load on the rod.
Freehand Line with Arrow
Use this tool to highlight any curved path that requires the suggestion of direction, such as the curved-line path of the rod tip that produces an open loop or a non-loop.
Circle
I use the circle most often simply as an indicator. For example, to point out the repositioning of the rod hand during drift, I’ll draw a circle around the rod hand at the point at which the rod unloads on the back cast, and then draw another circle around the hand after it has repositioned (Figure 6-6).
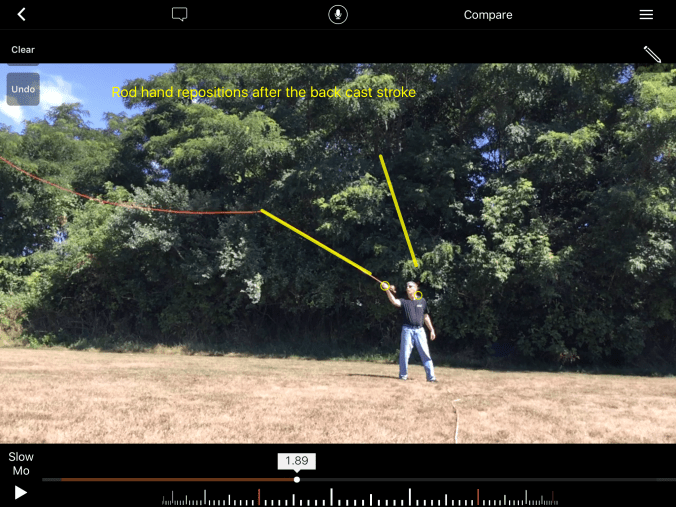
Figure 6-6. Use the circle as an indicator, simply to focus the viewer’s gaze on what you want to show.
Square or Rectangle
The square or rectangle—you can adjust the particulars by dragging the stylus before lifting it from the screen—can also be used as an indicator. You may find some other uses for it.
Angle
The obvious uses of the angle tool would include illustrating the angle of the butt of the rod to the underside of the forearm (too wide an angle would indicate a broken wrist on the back cast) or the angle between the body and the upper arm (of the rod arm) or the angle between the upper arm and forearm. However, to illustrate these well, the caster would have to be perfectly positioned to the camera. Also, the tool is a bit tricky to use. For these reasons, I don’t find the tool that useful and prefer to suggest any angles I wish to illustrate simply by using a series of straight lines.
Text
The text tool allows you to insert text into reviews in the form of captions or notes (Figure 6-6). It has no real application for providing instant feedback. Once you select the text tool and tap the screen, your keyboard will appear. The text will begin wherever you tapped the screen.
Stopwatch
You can insert a stopwatch (1/100 second increments) at any point in the clip. You could use this to determine, for example, how long a particular cast actually took to deliver. I imagine you could also use it to calculate the speed of a cast, should you wish to do that. Beyond this, I don’t see any use for it, but drop me a note and let me know if you do.
.
7. Instant Feedback
You can use the Hudl app during a casting lesson to get instant feedback from your coach. If there’s something in your technique your coach wishes to point out to you and you can capture it on camera, you can take a quick break to review the clip. Here you’ll have all of the playback features and drawing tools at your disposal. Be aware that the screen of a phone or tablet is difficult to view in bright daylight. Try to conduct your casting lessons in areas that will offer some shade in which you can review video (for example, my town common has a large gazebo). If nothing else, lifting the tailgate or trunk lid of a car can provide some shade, as well as the inside of the car.
If you’re using a tripod—again, I recommend it—the coach can assume your position, take the rod, and you can shoot a clip of him demonstrating correct technique. This will give you a video clip shot from the same distance, angle, etc., as your video clip. If you wish, you can use the Compare function (more on this later) to view the two clips simultaneously—side-by-side, stacked, or as an overlay. You likely will find this extremely valuable.
You can also use instant feedback to conclude a lesson. For example, you can take the last fifteen minutes or so of a lesson to review with the coach the clips you shot during the lesson. He can give you feedback regarding the areas of your cast that need to be addressed in the practice sessions leading up to the next lesson.
.
8. Video Reviews
While you’ll no doubt find instant feedback extremely helpful, you’ll likely forget at least some of what your coach has gone over shortly after the lesson ends. A permanent voiced-over video Review solves this. (Please note, at this writing the Review function is available only on iOS devices and is not available on Android.) You can create this together even if your coach doesn’t know how to use the technology.
To begin creating a video Review, simply tap the Microphone icon at the top center of the screen. The bar that runs across the top of the screen will turn red, and the Microphone icon will transform into a square button. At this point, everything is being recorded, including everything that is said, all playback options, and whatever drawings you make. The Pause feature (upper right of the screen) allows you to pause a review in progress, and the Resume feature allows you to continue.
The simplest Review you could make would be to scrub through the clip frame by frame while your coach critiques your cast—what issues he sees and what you need to do to fix them. If you wish, you can use the drawing tools here to highlight certain aspects of your cast as he speaks. There really is no wrong way to create a Review. The point is to create Reviews that are clear to you and that you can use to direct your practice sessions to refine your technique.
When you’ve finished the Review, simply tap the square button at the top center of the screen. You’ve now created permanent feedback that you can use yourself or share with others. The Elite version of Hudl will upload both clips and reviews to its cloud after a period of time that you specify in the Settings. You can then download these to your device and watch them as you wish. Clips and Reviews will remain on the cloud until you decide to delete them. Until such time, anyone with whom you’ve shared the clips can access them as well.
The ability to create and share video clips and Reviews allows you to receive coaching remotely—either as followup to personal instruction, or even from a coach you have never met. This alone, I’m convinced, is going significantly impact the way fly casting is taught and learned in the future.
To view the capabilities of what you can do in a Review, take a look at the series of posts titled The Essentials of Distance Fly Casting, as many of the illustrations were created with the Hudl app.
.
9. References
Nobody learns to fly cast in a vacuum. At least, I’ve never seen someone who I thought was a truly good caster who was completely unschooled. Similarly, it would be impossible to analyze your cast in a vacuum, as you need a guiding set of principles and concepts on which to base your analysis. If you’re serious about becoming a better fly caster, you must build a library of instructional articles, books, and DVDs, to educate yourself, and against which you can compare your own technique.
It’s no secret I’m partial to the works of Joan Wulff, as these had the greatest influence on my development as a fly caster. When I was learning to cast, I had read and watched everything I could find on the subject—at the time, there wasn’t that much—and I’m sure I took away something from every work.
I think it’s important to find references that resonate with you—whether it’s Joan Wulff’s work, or someone else’s. The language of fly casting is simply a learning tool, and I don’t think it’s particularly important whose language you use as long as it helps you to learn the physical skill. I’m not convinced a fly casting language that sounds more scientific will necessarily produce better fly casters, any more than a degree in engineering will make someone a better race car driver. Learning the physical skill of fly casting is much more art than science, and the ultimate goal is for your technique to transcend all language.
Hudl Technique makes it possible for you to create a library of videos and Reviews you can use as references. Shoot videos of yourself, your coach, your fellow fly casters. If you attend a casting seminar, ask the instructor if he or she would allow you to video them (they’ll probably love it). There are also ways to download video clips from the internet and YouTube (I’ll let you Google how to do that yourself).
.
10. Sharing Videos and Reviews
The Hudl Technique app offers you several options for sharing videos and Reviews with members of your team (more about creating teams later), other individuals, other apps and devices, or even with social media. Simply tap the Share icon and a dialog box will appear, presenting you with options. Please use some common sense and courtesy here. Get permission before sharing someone’s video with anyone but him or her—particularly if you intend to post it in a public area such as YouTube.
Once you share a video with someone through the Hudl app or website, that person will be able to view the video until you delete it. If the person downloads the video onto his personal computer, he will have the video permanently.
Your ability to share clips through the Hudl app and website allows you to receive coaching remotely (provided the coach has the app himself and knows how to use it).
.
11. Other Features and Functions
Hudl contains a number of non-analytical features and functions that you can access through the Menu icon at the top right of the screen, including the Trim and Flip functions.
Trimming Video
Some part of virtually every video clip will belong on the cutting room floor. Hudl gives you the ability to do this quickly. Simply tap the Menu icon at the top right of the screen and you’ll be presented with a number of options (Figure 11-1).

Figure 11-1. The Menu icon presents you with a number of non-analytical features and functions, such as trimming video clips.
The Trim icon is a Pair of Scissors. When you tap this icon, a yellow bar will appear along the top of the screen that will allow you to trim from both the front and back of the clip (Figure 11-2). When you tap Save, you’ll be asked whether you want to trim the original clip or save the trimmed version as a new video. This will allow you to get rid of “dead air” at the beginning or end of a clip, but it will also allow you to grab select segments from within a longer clip and save them as separate videos.
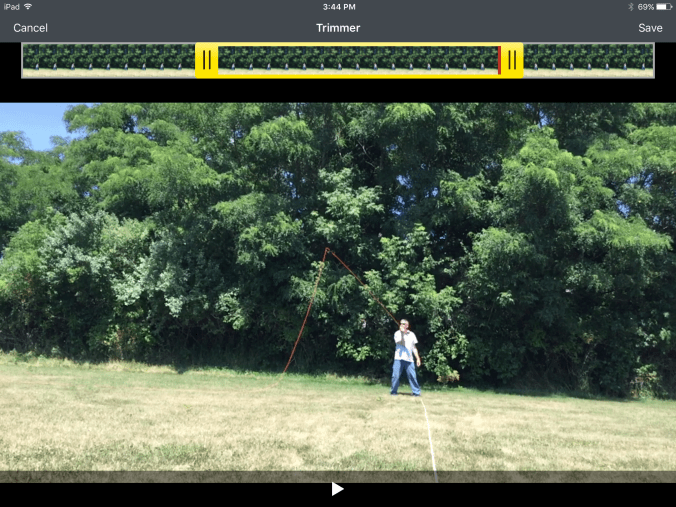
Figure 11-2. The Trimmer allows you to cut “dead air” from the back and front of the clip, and also take select segments from a longer clip.
Flipping Video
Access the Flip function by tapping the Menu icon at the top right of the screen. Tapping the Flip icon (shown in Figure 11-1) will allow you to create a mirror image of a video clip (Figure 11-3). This is useful to share a video with someone whose dominant hand is different from that of the caster in the video. A left-handed caster likely will get more from watching a left-handed caster than he will a right-handed caster.

Figure 11-3. Flip the video when sharing a clip or review the with a caster whose dominant hand is different than yours.
Comparing Videos
You’ll find the Compare option at the top of the screen next to the Microphone or Review icon (Figure 11-3). Tap this and it will give you the option of comparing the present video to other videos in your collection—either side-by-side, stacked (depending on whether you hold the phone or tablet landscape or portrait), or as an Overlay. (Hudl offers videos of pro athletes to purchase for comparison, but at this writing, there are no pro athlete fly casting videos in the Hudl collection.) You either can compare two videos of yourself—for example, proper technique with improper technique—or you can compare one of your videos against a video of another caster (your coach, for example). The Lock icon at the bottom right of the screen allows you to lock the two clips in synch. Simply use the individual Scrubbers to locate the beginning of each cast (or anyplace else you wish to lock them), then tap the Lock. When you tap the Play button the clips will play in synch.
The Overlay option—the Overlay icon is two rectangles, one atop another at the top right of the screen—allows you to meld both clips into one. A tool at the center of the screen allows you to adjust for image dominance. Frankly, I haven’t found this option very useful for what I want to do, but perhaps you will.
The Compare function of Hudl allows you to save comparisons as new videos, or to even create video Reviews of the comparisons (Figure 11-4).
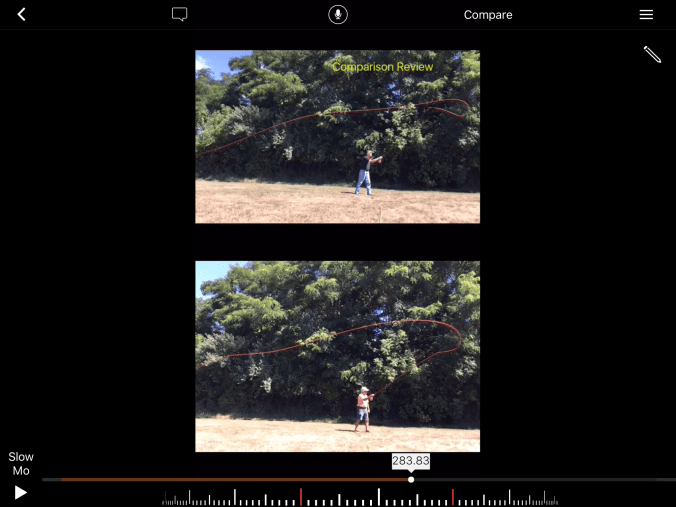
Figure 11-4. The Compare function of Hudl allows you to create comparison videos and Reviews.
Labeling Favorites
The Star icon allows you to label a video as a Favorite. This feature is helpful when looking through a lot of video clips and deciding what clips to keep or delete. You can also search videos by Favorites.
Tagging Videos
As soon as you record a video, the Hudl app will ask you to Tag it by asking you what technique it is. The Hudl Technique app comes preloaded with a number of techniques from a number of sports—none of which is fly casting. The major drawback to this is that you cannot post a video to the Hudl Community (more on this later) until it is tagged, and there presently is no option for creating a custom tag. The videos I’ve posted on the Hudl Community I’ve had to tag with techniques from archery. I’m hopeful that in the future Hudl will expand their roster of sports to include fly casting, or at least give the user the ability to create a custom tag.
When you pull up the Tag dialog box you will be asked who the athlete is. You can either leave this blank (the clip will then be tagged “Unknown Athlete”) or you can identify the athlete as yourself or another team member. Tagging videos by athlete helps you to keep them organized.
Adding Comments
Tap the Comments icon, which you can access from several areas of the app, to add comments to any video or Review. You and your teammates can exchange comments on any mutually-shared video. When you pull up your roster of videos, you’ll be able to see the first comment written. Therefore, I’ll often write a comment simply as a reference to what’s going on in the video or Review to help me find it quickly and to organize. For example, my comment might read, “Baseline distance cast,” or “Back cast exercise, 40 feet of line outside the rod tip.”
Deleting Videos
Videos will accumulate quickly. During a typical casting lesson I may shoot as many as 20 clips. Not all of these will be useful. I make it a habit to go through my videos from each lesson and delete all videos I’m not going to use–which is most of them. Be careful about doing this too hastily, or doing it when you’re tired, for once you delete a video you won’t be able to retrieve it. Again, this is where the Favorites feature comes in handy.
Creating Your Team
To create your team, tap your Team icon at the left of your screen. To add a team member, tap the Plus Sign at the top right of the screen. It will bring up a dialogue box giving you several options for entering the team member. At first, it’s probably easiest to enter the team member manually. Select that option and you can enter her name and email address. She’ll presently receive an email from you asking her to accept your invitation to join your team on Hudl. Once she accepts, you’ll receive notification and her name will appear in your team roster. Should she not want to join your team, you can still share videos with her by entering her email after you tap the Share icon. She’ll be able to view the video through the Hudl website.
Creating and Editing Your Profile
You’ll create and edit your profile and account through the Hudl website. This will allow you to upload your photo as well as include a link to your website, if you have one. You can edit your profile through the Hudl Technique app. Simply tap the Profile icon at the left of the screen, then hit the Settings icon, the Gear above your profile photo. To take a look at my page on Hudl, click here.
.
12. The Hudl Community
I’m a customer of Hudl, not an ambassador. In my opinion, the Hudl Community is the app’s weakest feature–at least at this writing. Hudl gives you the ability to post your videos to the Community for all members to see. Other members, including coaches, can then view your videos and comment on them.
As I mentioned earlier, you cannot post a video to the Community until you tag it, and there presently is no way to tag a video as “fly casting.” This would make it difficult for other fly casters or coaches to even locate your videos. Overall, the Community feature of Hudl is not very user-friendly and is difficult even to locate on their website.
Even if this feature of Hudl did work correctly, I’m not sure I could recommend it. That is, I would not recommend having your technique critiqued by someone who may or may not know what he’s talking about.
These minor criticisms aside, I’m convinced this technology is destined to make great improvements in the way fly casting is taught and learned.
.
Afterword
This post should get you started using video analysis to improve your fly casting. If you find the post was helpful, I’m going to ask you to do two things. First, drop me a note and tell me about your experiences. Second, please share it with other fly casters you think might find it helpful as well.
If your fly shop, club, or organization would be interested in hosting a seminar devoted to video fly casting analysis–either geared toward students or geared toward instructors–feel free to contact me.
